


Why Composting Matters More Than You Think
Here’s a number that stopped me in my tracks: according to the EPA, food scraps and yard waste together make up more than 30% of what we throw away in the United States. That’s a staggering amount of organic material rotting in landfills, where it can’t decompose properly because it’s buried under layers of plastic and other waste, starved of oxygen.
When organic matter decomposes anaerobically, without air, it produces methane, a greenhouse gas roughly 80 times more potent than carbon dioxide over a 20-year window. Composting at home redirects that material into an aerobic process, one that produces carbon dioxide and water vapor instead. It’s a genuinely meaningful climate action you can take from your own backyard.
But the benefits don’t stop at emissions. Finished compost improves soil structure, helps the ground retain moisture, feeds beneficial microorganisms, and reduces the need for synthetic fertilizers. I’ve watched patches of my garden go from hard, compacted clay to loose, dark, worm-rich earth, and compost was the main reason.
There’s also something quietly satisfying about closing the loop. You eat the food, the scraps go back to the soil, the soil grows more food. It’s not a new idea. People have been composting for thousands of years. We just forgot about it for a while.
And if you’re thinking, “Sure, but I’m just one person”, fair point. But the average American household produces about 6.5 pounds of food waste per week. Over a year, that’s almost 340 pounds of material you could keep out of the landfill and put back into the earth. One household at a time, it adds up.
What You Can (And Can’t) Compost From Your Kitchen
Not everything from your kitchen belongs in a compost pile, and getting this wrong early on is one of the fastest ways to end up with a smelly, pest-ridden mess. So let me break it down.
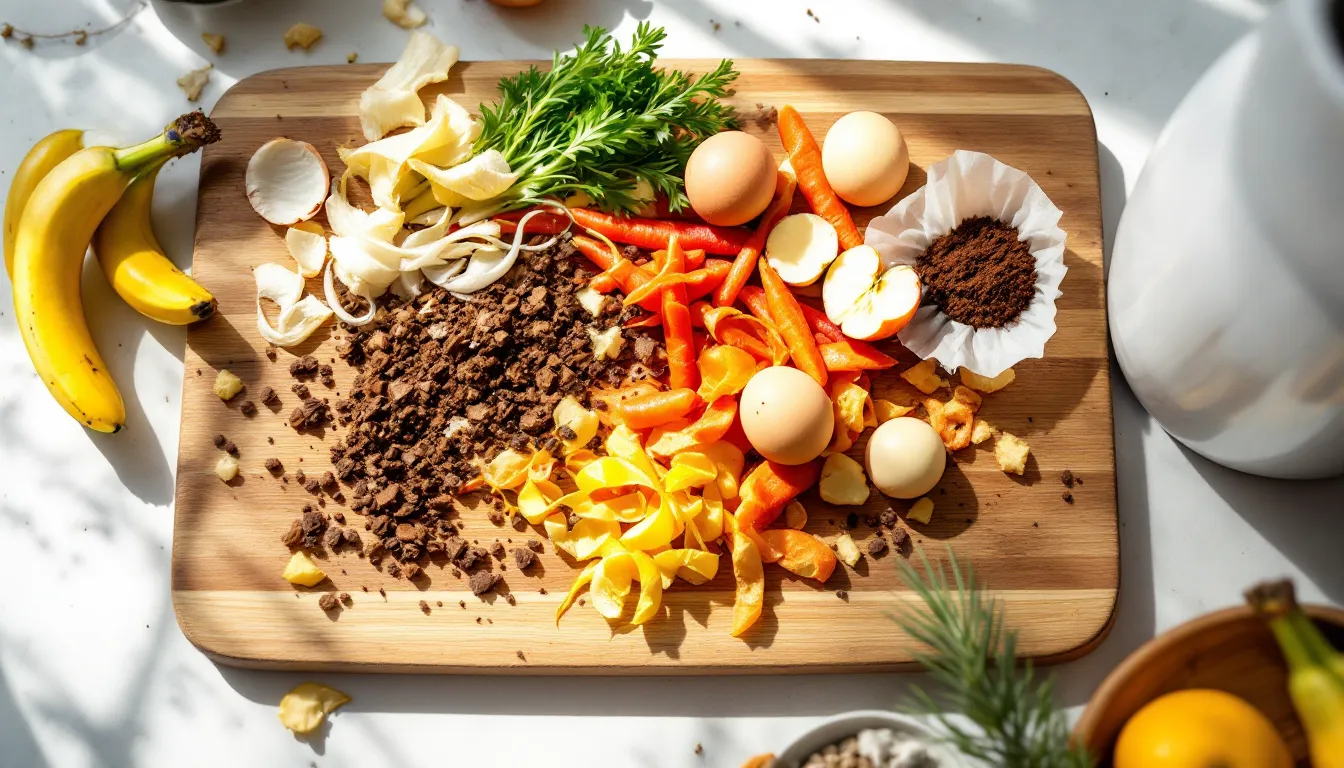
Most fruit and vegetable scraps are fair game, banana peels, apple cores, carrot tops, wilted lettuce, onion skins, potato peels. Coffee grounds and paper coffee filters go right in. Tea bags work too, as long as they’re not made with synthetic material (check for a staple or plastic seal). Eggshells are great, they add calcium to your finished compost, though they break down faster if you crush them first.
Stale bread, plain rice, and cooked grains can go in, but in small amounts. They tend to attract pests if you pile them on top without covering them.
What to leave out: meat, fish, dairy, and oily or greasy foods. These don’t just smell terrible as they decompose, they attract rodents and can introduce harmful bacteria into your pile. Same goes for pet waste, which can carry pathogens you don’t want anywhere near your garden soil. Avoid composting diseased plants or weeds that have gone to seed, unless your pile consistently reaches high enough temperatures to kill them off (more on that later).
Green vs. Brown Materials: Getting the Balance Right
This is the part that trips most beginners up, but once you understand the logic, it’s straightforward.
“Greens” are nitrogen-rich materials, your fresh kitchen scraps, grass clippings, coffee grounds, and fresh plant trimmings. They’re typically moist and break down relatively quickly.
“Browns” are carbon-rich materials, dry leaves, cardboard, newspaper, straw, wood chips, and dried plant stalks. They tend to be dry and take longer to decompose on their own.
A healthy compost pile needs both. The general rule of thumb is a ratio of roughly 3 parts brown to 1 part green by volume. You don’t need to measure precisely. Think of it this way: every time you dump a container of kitchen scraps into your bin, toss in a few handfuls of dry leaves or torn-up cardboard on top.
The browns absorb excess moisture from the greens and provide structure, creating air pockets that allow oxygen to reach the microbes doing the actual work. Too many greens and your pile gets soggy and starts to smell. Too many browns and decomposition slows to a crawl.
I keep a paper bag of dried leaves next to my compost bin in the fall so I’ve always got browns on hand through the winter. Cardboard torn into small pieces works year-round. It’s a simple habit that makes a real difference.
Choosing the Right Composting Method for Your Space
There’s no single “right” way to compost, which is actually good news. It means you can find a method that fits your living situation, your schedule, and the amount of waste you produce.
Traditional Bin Composting
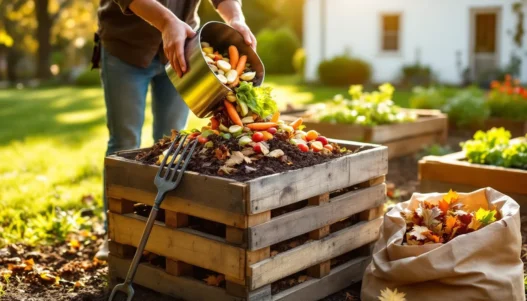
This is what most people picture when they think of composting, a bin or enclosure in the backyard where you layer greens and browns over time. You can buy a ready-made compost bin (they range from about $40 to $150) or build one from wooden pallets, wire mesh, or even cinder blocks.
I started with a basic three-sided wooden bin my neighbor helped me throw together in an afternoon. Nothing fancy. The open front made it easy to turn the pile and eventually shovel out finished compost from the bottom.
Traditional bins work well if you have a yard and generate a moderate to large amount of kitchen and garden waste. They do require occasional turning, every week or two, to keep things aerated. And they take a bit of space, roughly 3 feet by 3 feet at minimum to generate enough heat for efficient decomposition.
Tumbler and Indoor Options for Small Spaces
If you’re working with a small yard, a patio, or even just a kitchen counter, you’ve still got options.
Tumbler composters are enclosed drums mounted on a frame that you can spin to mix the contents. They’re tidy, pest-resistant, and faster than a static bin because the tumbling action aerates the material regularly. Most tumblers produce usable compost in 4 to 8 weeks under good conditions. The trade-off is capacity, they hold less material than an open bin, and once they’re full, you need to stop adding scraps and let the batch finish.
Bokashi composting is an indoor-friendly method that uses fermentation rather than traditional aerobic decomposition. You layer kitchen scraps with a special inoculated bran in a sealed bucket, let it ferment for about two weeks, then bury the pre-composted material in soil or add it to an outdoor pile. It handles things traditional composting can’t, including small amounts of meat and dairy, and produces almost no odor when done correctly. It’s a great choice for apartments.
Vermicomposting, worm composting, is another indoor option. A bin of red wiggler worms processes kitchen scraps surprisingly quickly and produces rich worm castings (which is a polite way of saying worm poop, and your plants go wild for it). The worms are quiet, low-maintenance, and the whole setup can fit under a sink.
I’ve tried all three. Right now I run an outdoor bin for volume and a small worm bin in my garage for winter months when I’m less inclined to trudge outside in the cold.
How to Set Up Your First Compost Pile Step by Step
Let’s keep this practical. Here’s how I’d tell a friend to get started.
Pick your spot. If you’re going with an outdoor bin, choose a level area with decent drainage. Partial shade is ideal, full sun can dry out the pile too fast in summer, and deep shade keeps it too cool. Place it somewhere convenient enough that you’ll actually use it. If it’s a 10-minute walk from your kitchen door, you’ll stop going.
Start with a brown layer. Lay down about 4 to 6 inches of coarse brown material on the bottom, small sticks, dried leaves, straw, or torn cardboard. This creates airflow at the base and helps with drainage.
Add your first greens. Empty your kitchen scrap container on top of the browns. Spread it out a bit so it’s not just a dense clump in the center.
Cover with more browns. Add another layer of brown material on top, roughly two to three times the volume of the greens you just added. This cover layer reduces odors, discourages flies, and maintains the carbon-to-nitrogen balance.
Lightly moisten if dry. Your pile wants to feel like a wrung-out sponge, damp but not dripping. If your browns are very dry, give the pile a light sprinkle with a hose or watering can.
Repeat. Every time you add kitchen scraps, cover them with browns. That’s really the core habit. Layer, cover, repeat.
After a week or two, you can give the pile its first turn with a garden fork or pitchfork, just lift and flip the material to mix it up and introduce air. If you’re using a tumbler, a few spins every couple of days does the same job.
The whole setup takes maybe 30 minutes. After that, the ongoing effort is about 5 minutes per day (collecting scraps) and 10 minutes per week (turning). That’s it.
Maintaining Your Compost: Moisture, Aeration, and Temperature
A compost pile is a living system. Billions of microorganisms are in there doing the heavy lifting, bacteria, fungi, actinomycetes, and they need three things to work well: moisture, oxygen, and the right temperature range.
Moisture is the one most people get wrong first. Too wet, and you suffocate the aerobic microbes, leading to anaerobic conditions (and that sour, rotten smell). Too dry, and microbial activity slows or stops entirely. The wrung-out sponge test is your friend. Grab a handful of material from the center of the pile and squeeze. A few drops of water should come out. If water streams through your fingers, add more browns. If nothing comes out and the material feels dustite, add water.
Aeration is why we turn the pile. Oxygen feeds the microbes that do clean, efficient decomposition. Without it, a different set of organisms takes over, the anaerobic kind, and they produce hydrogen sulfide (that rotten-egg smell) and organic acids. Turning the pile every 1 to 2 weeks is usually enough. If you notice compacted, wet zones in the center, break them up.
Temperature tells you what’s happening inside. A well-built pile will heat up to between 130°F and 160°F (55°C to 70°C) within a few days as microbes get to work. This hot phase is valuable, it kills weed seeds and pathogens. After the initial heat spike, the pile gradually cools as available material gets consumed. You can reignite the heat by turning the pile and adding fresh greens.
A compost thermometer (around $15) is a nice tool to have, but it’s not required. If you stick your hand near the center of the pile and feel warmth, things are moving. If it’s cold and nothing seems to be happening, the pile likely needs more nitrogen (greens), moisture, or a good turn.
I check my pile every few days, mostly out of curiosity. It doesn’t take long to develop a feel for what it needs.
Troubleshooting Common Composting Problems
Things will go sideways at some point. Don’t let that discourage you, it’s all fixable.
Bad Odors, Pests, and Slow Decomposition
If your pile smells like ammonia, you’ve got too much nitrogen, too many greens relative to browns. The fix is simple: add a generous layer of carbon-rich browns (dry leaves, shredded cardboard, straw) and turn the pile to mix things up. The smell usually clears within a day or two.
If it smells like rotten eggs or something sour, the pile is too wet and has gone anaerobic. Turn it thoroughly to introduce air, and mix in dry browns to absorb excess moisture. If the pile is sitting in a low spot where water pools, consider relocating it or improving drainage underneath.
Pests, fruit flies, rodents, raccoons, almost always show up because food scraps are exposed on the surface. Always bury fresh kitchen scraps under a layer of browns. Meat, dairy, and oily foods are the biggest attractors, so keep those out of open-air systems entirely. A secured bin with a lid helps too. I once left a pile uncovered after adding melon rinds and had a raccoon party within 48 hours. Lesson learned.
Slow decomposition has a few possible causes. The pieces might be too large, chopping or breaking scraps into smaller bits exposes more surface area to microbes and speeds things up considerably. The pile might be too small to retain heat (aim for at least 3 cubic feet). It could be too dry, too compacted, or lacking nitrogen. Typically, a combination of turning, adding water, and tossing in some fresh greens gets things moving again.
Matted layers of grass clippings or wet leaves can form an impermeable sheet that blocks airflow. Break these up and mix them with coarser material.
Most composting problems come down to the same few imbalances, too wet, too dry, not enough air, or a skewed green-to-brown ratio. Once you can identify which one you’re dealing with, the solution is usually quick and obvious.
How to Use Your Finished Compost in the Garden
You’ll know your compost is ready when it looks like dark, crumbly earth, smells pleasantly earthy (like a forest floor after rain), and you can no longer identify the original materials. Depending on your method and conditions, this takes anywhere from 2 months to a year.
If there are still recognizable chunks, a half-decomposed corn cob, a stubborn avocado pit, you can screen them out with a simple mesh sieve and toss them back into the active pile.
Once it’s finished, here’s how I use mine.
As a soil amendment. I mix 2 to 3 inches of compost into garden beds before planting season. It improves soil structure in both directions, it loosens heavy clay and helps sandy soil retain moisture. The microbial life in finished compost also feeds the soil food web, which in turn feeds your plants.
As a top dressing. A half-inch layer of compost spread around the base of established plants acts like a slow-release fertilizer. It breaks down gradually over the season, delivering nutrients without the risk of burning roots the way synthetic fertilizers can.
In potting mixes. I blend compost with perlite and coconut coir for container plants. A general ratio is about one-third compost, one-third perlite, and one-third coir. It provides nutrients and moisture retention without making the mix too dense.
As a lawn top dressing. Spread a thin layer (quarter inch) over your lawn in spring or fall and rake it in lightly. It feeds the grass and improves the soil beneath over time.
Compost tea is another option, steeping finished compost in water for 24 to 48 hours to create a nutrient-rich liquid you can use to water plants or spray on foliage. I’m still experimenting with this one, but the plants I’ve used it on do seem to respond well.
One thing to keep in mind: compost isn’t a complete fertilizer. It provides a broad spectrum of nutrients and improves soil biology, but for heavy-feeding crops like tomatoes or corn, you may still want to supplement with specific amendments based on a soil test.
Conclusion
Composting isn’t complicated. It’s really just managing the conditions for decomposition that would happen on its own anyway, you’re just speeding it up and directing the output somewhere useful.
What I love about it, honestly, is how it changes the way you see waste. That pile of vegetable peels stops being garbage and starts being a resource. The wilted herbs you forgot about in the fridge aren’t a failure, they’re future soil. There’s a shift in perspective that happens quietly once you start, and it tends to ripple outward into other parts of how you live.
You don’t need a perfect setup to begin. A pile in the corner of your yard, a bin under your sink, a bucket of worms in the garage, any of these will work. Start with what you have. Adjust as you learn. The microbes are forgiving, and the soil will thank you.
If you’ve already started composting, I’d love to hear what’s worked for you, or what tripped you up. And if you’re on the fence, what’s holding you back? Drop a thought in the comments. Sometimes the best nudge comes from hearing someone else’s experience.